We’re excited to guide you through the process of creating your very own decorative piece that adds a personal touch to your home. This fun and creative project is perfect for those who love crafting and decorating their living spaces.
Creating a beautiful wreath using simple materials can be a rewarding experience. With our friendly guide, you’ll learn how to make a unique piece that can be customized to fit any season or decor. Whether you’re a seasoned crafter or a beginner, our step-by-step instructions will help you every step of the way.
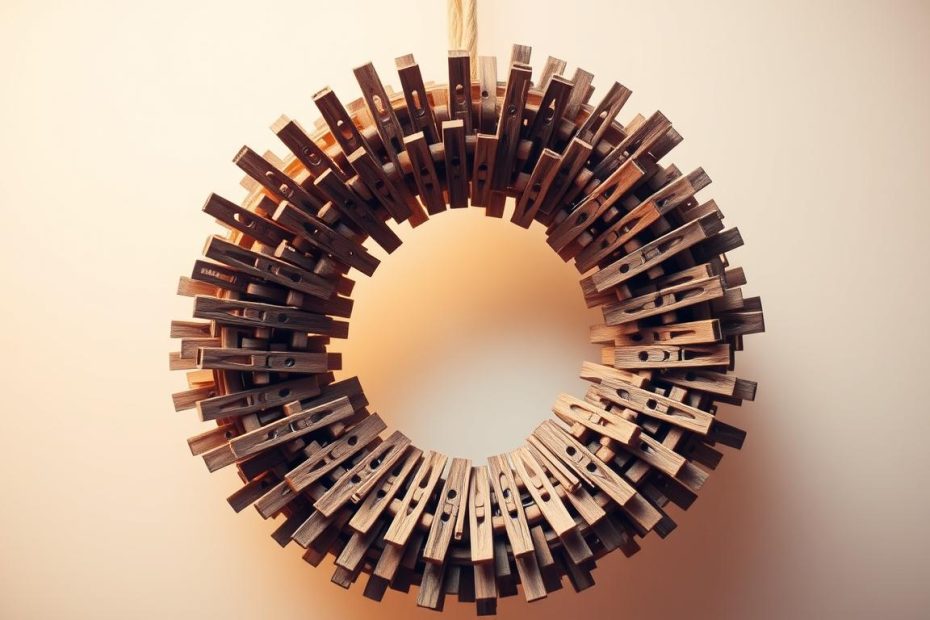
Materials and Supplies for DIY Clothespin Wreaths
The foundation of a stunning DIY Clothespin Wreath lies in the materials you choose. To create a beautiful and durable wreath, you’ll need to gather a few essential supplies.
Essential Materials You’ll Need
To get started with your DIY Clothespin Wreath, you’ll need clothespins, a wire or foam wreath frame, and a hot glue gun. Clothespins are the core component, and you can choose between wooden or plastic ones, depending on your preference. A wire or foam wreath frame provides the base structure, while a hot glue gun is necessary for attaching the clothespins to the frame.
Optional Decorative Elements
You can personalize your DIY Clothespin Wreath with various decorative elements. Consider adding ribbons, flowers, or paint to give your wreath a unique touch. These elements can enhance the aesthetic appeal of your wreath and make it more suitable for different occasions or seasons.
Tools for Assembly
For assembling your DIY Clothespin Wreath, you’ll need a few basic tools. A hot glue gun is essential, as mentioned earlier. Additionally, you may need wire cutters to trim any excess wire from the clothespins or the wreath frame. Having these tools on hand will make the assembly process smoother and more efficient.
Step-by-Step Guide to Creating Clothespin Wreaths
Now that we have our materials ready, let’s dive into the fun part of creating our DIY Clothespin Wreaths. This step-by-step guide will walk you through the process, from preparing your clothespins to adding the final decorative touches.
Preparing Your Clothespins
Before we start assembling our wreath, we need to prepare our clothespins. This may involve painting or decorating them to match our desired theme or color scheme.
To prepare your clothespins, start by cleaning them to remove any dirt or debris. If you’re painting them, apply a primer first to ensure the paint adheres well. You can use a spray paint or brush-on paint, depending on your preference.
Painting and Decorating Tips
When painting your clothespins, consider the overall aesthetic you want to achieve. You can use a single color or mix and match different colors for a more eclectic look.
For a rustic look, you can distress the paint by lightly sanding it after it dries. Adding a coat of varnish can protect the paint and give it a glossy finish.

Assembling the Base Structure
The base structure of your wreath provides the foundation for attaching the clothespins. You can use a wire or foam wreath form, depending on the look you want to achieve.
To assemble the base, simply shape your wire or foam into a circular form. If using wire, you can bend it into a circle and secure the ends together. For a foam wreath form, you might need to hot glue the ends if it’s not already a complete circle.
Attaching Clothespins to Your Wreath
With your base ready, it’s time to attach the clothespins. This is where your creativity shines, as you can arrange the clothespins in various patterns or designs.
Start by applying a small amount of hot glue to the base of a clothespin and attach it to the wreath form. Continue adding clothespins around the wreath, overlapping them slightly as you go, until the entire form is covered.
Pattern Ideas and Arrangements
You can arrange your clothespins in a uniform pattern or get creative with different patterns.
Some ideas include alternating the direction of the clothespins or creating a random, organic look. Experiment with different arrangements until you find one that you like.
Adding Decorative Elements
Once your clothespins are attached, you can add decorative elements to enhance the look of your wreath.
This could include ribbons, bows, flowers, or any other embellishments that fit your theme. Use hot glue to secure these elements to your wreath.
Sealing and Weatherproofing Your Wreath
To ensure your wreath lasts, especially if it’s going to be displayed outdoors, you’ll need to seal and weatherproof it.
Apply a clear coat of varnish or sealant to protect the paint and any decorative elements from the elements.
Seasonal Variations and Display Ideas
One of the best things about DIY Clothespin Wreaths is their versatility. We can easily update our wreath to match different seasons and occasions, making it a great addition to our DIY home decor.
For Christmas, we can add red and green decorations, pinecones, and ribbons to give our wreath a festive look. In the spring, we can adorn our wreath with Easter flowers, pastel-colored eggs, and other seasonal embellishments. Summer is perfect for adding seashells, starfish, and other beach-themed decorations.
When it comes to displaying our finished wreath, the options are endless. We can hang it on our front door, place it on a wall, or use it as a centerpiece for our dining table. By following our wreath making guide, we can create a beautiful and unique DIY Clothespin Wreath that reflects our personal style and complements our home decor.
With a little creativity, our DIY Clothespin Wreath can be a stunning addition to our home, perfect for any season or occasion.